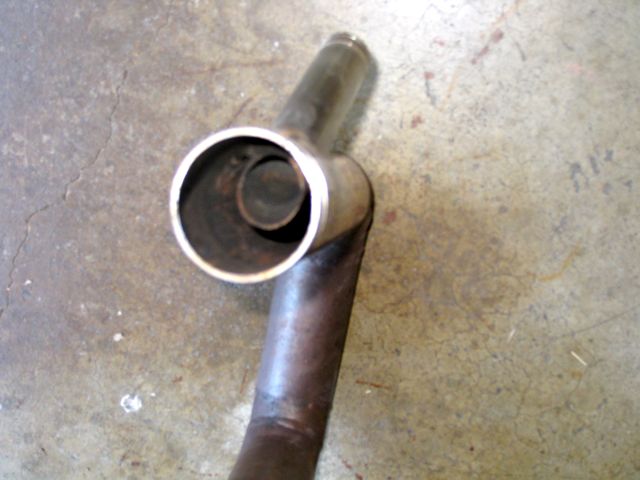
Ah yes the exhaust system; such an exciting project. Well if you’re a boat geek like me it is anyway. So, Charisma had two things going that finally made me tackle this project. One, last time the mechanic worked on the engine, he wrote drastic warnings on the invoice that the exhaust mixer could cause catastrophic issues if it failed and it looked “suspicious”. Ah, oh! Two, after sailing recently, she developed an air lock in the exhaust system and no water was coming out the exhaust. OK, can’t ignore that project anymore. Time to dive in. Here’s a picture of the system before the repair. You can just see some corrosion on the left where the raw cooling water is injected into the exhaust pipe just before it enters the muffler on the bottom of the picture.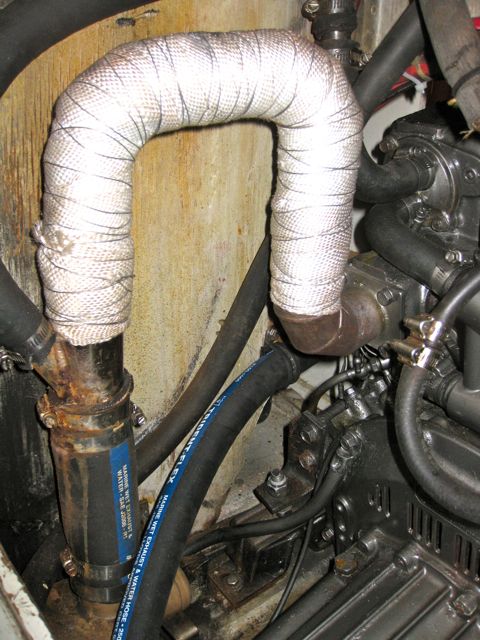 After consulting many websites and a couple friends I determined that the only way I would be able to solve these problems was to just take the darn thing apart and inspect it. That of course is always the easy part. Things always come apart easily (hint, hint!) Even though the hoses looked like they would require a lot of “convincing”, my patented method of hose release (run a “pick” around the hose to break the corrosion/seal) the thing actually came out pretty easily. After about half an hour I had it on deck for inspection. It looked surprisingly good. After I disconnected the short hose from the SS exhaust pipe, I saw that what looked like a potential internal catastrophe was really only a little bit of external corrosion pitting where the hose had leaked a bit over time at the hose clamp. I was able to polish the pitting out and bought some new hose and clamps. The inside of the SS exhaust pipe looked like new, albeit black with a light carbon soot, but no hint of corrosion. Here’s the system broken into it’s component pieces. Also, here’s a picture of the internal section of the system where the raw water injects into the pipe.
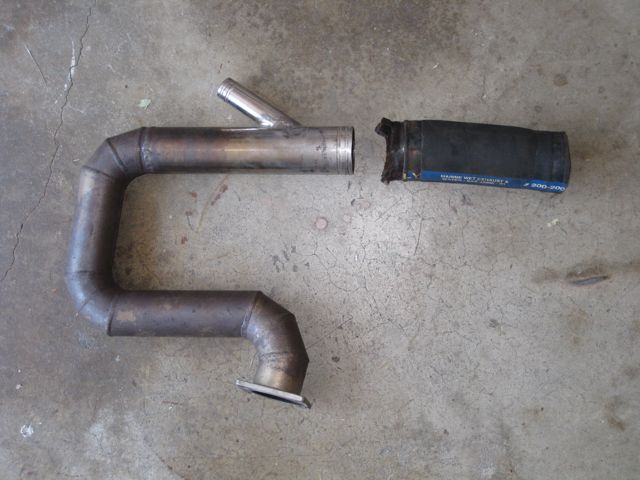
 So, after buying some new hose, new insulating tape and some SS wire to wrap the tape (suitably twisted and secured at each end, aircraft style), I was ready for the re-installation. (Note to self: next time wear long sleeves, long pants and a respirator when handling fiberglass insulation tape. The stuff floats everywhere in the air and itches!) As expected, what comes out never goes back easily. Getting the two bolts on the “far side” of the exhaust flange to go back in, when deep in the lazarette, squeezing my shoulders through the bulkhead and reaching over the transmission was a challenge. After much swearing and a half hour or so of grunting, dripping sweat, using one hand to support my body, the other to turn the bolt and my head strategically pushing the pipe so the flange would seat, the recalcitrant bolts finally succumbed. The rest was just tightening hose clamps to the muffler. But before I put the raw water hose back on the system, I used the dock hose to pressurize the raw water system and hopefully purge the airlock. A faint hope that the cure would be so simple, but worth a try. Took a bit to get the system pressurized but after spraying water all over the lazarette while squeezed cross-legged against the cabin wall, (note to self: wear foul weather gear next time) I finally got water to come out the other side. I actually think there might have been a blockage of some sort that I blew out because after tightening everything down and starting the engine, voila, the system worked and water came out the exhaust as it’s supposed to. Imagine that. A project that actually worked. Just to keep me humble though, the other two projects I was working on refused to comply, so for the weekend, I was only one for three. OK, I’ll take that.
Sail Charisma
The Adventure Continues!

Nice explanation and pix. Mine looks exactly the same. The blockage you experienced was probably the flapper valve right at the exit thruhull. Those are known to give trouble. You probably want to get in the aft lazarette and take the access cover off the flapper and clean out the corrosion. Consider leaving the flapper out as it is overkill; there is plenty of rise in the hose to prevent hydrolock.